Blade Depth and Pressure

A lot of people have ventured into the world of cutting machines with very little understanding of what they are doing. It’s not their fault, the machine companies push the idea that all you have to do is to press a button. It’s simply not true.

I have a much easier time with vinyl than many people I see posting in Facebook groups. I think that’s because I started and worked with paper for many years. While working with paper, it was necessary to develop an understanding of blade depth and pressure (called thickness by Silhouette). By calling pressure “thickness” they confuse a lot of people, because thickness of the material you are cutting actually relates more to blade depth.

Hobby machines all come with click-type adjustable blades (if you have an old Silhouette or Wishblade, it came with colored caps to adjust the blade. With a click blade, the higher the number, the more the blade sticks out. You may have purchased a CB09 blade for the Silhouette. That’s a professional Graphtec blade and to use it you need to understand what the blade is supposed to do.

THE BLADE: Blade adjustment comes first, whether cutting vinyl or paper. The blade should be extending no further than very slightly more than the thickness of your material. Too far and it will cut the mat, not far enough and it won’t cut through. This is a lot less than you might think it is. Any other adjustments should be made with the pressure or the “thickness”. Most people have their blade out too far. It should be sticking out just less than the thickness of a credit card. Other adjustments are made in the pressure setting (thickness on the Silhouette)

Take a minute and watch this video: ADJUSTING THE BLADE FOR VINYL CUTTING

Cutting Paper: Lately, it seems a lot of people are trying to cut paper. Adjusting the blade to cut paper is much trickier. The settings recommended by your machine are for their brand of paper only, and of course, you want to use a variety of papers. Don’t we all? Again, you want the blade only slightly deeper than your paper – you don’t want it cutting way into your mat. Too deep, and you’ll ruin your mat and it may shred your paper. Too shallow, and it won’t cut through. To test your blade setting, try this:

Put your paper on a piece of cardboard. Run your blade across it using a slight amount of pressure. Did it cut through the paper and only slightly mar the cardboard? If so, it’s good. If not, dial up or down. To see what this would look like, check out this page from US Cutter.

PRESSURE, THICKNESS, DOWNWARD FORCE: This is how much force the machine puts on the blade when cutting. I don’t know why Silhouette calls it THICKNESS since that is not a good description. I originally thought it had to do with how thick the material is, but really, it doesn’t. The thickness of the material determines your blade depth. For this reason, I prefer the term PRESSURE

This setting is how much downward force is applied to the blade as it is cutting. At its highest setting (33) the Silhouette studio has 210 grams of force. To round things off, each number on their thickness settings is about 6 grams of force. Interestingly, Provocraft has refused to release the cutting force of the Cricut, but since it can cut heavier material than the Silhouette, I would assume it is slightly more, maybe 300 grams. Most vinyl manufacturers recommend starting at 40 grams of pressure and adjusting form there. That would be 8 or 9 on the Silhouette Cameo.

Cutting paper is much more difficult than cutting vinyl. There are so many kinds of paper with such different characteristics. Not all settings work for all paper. The thickness and density of the paper are important factors. You should do test cuts for paper and write your settings on a sample and file them away (if only I practiced what I preach). This picture is recollections cardstock at the standard settings. The circle is OK, the square has not quite crisp corners and the triangle is a major handing chad.

IMG_1243

I then backed the blade off from 4 to 3 and it was a bit better, but the triangle and square still had to be pushed out and the corners weren’t crisp.

Here’s the secret: It’s the overcut function. I set mine to 0.2mm. What this does is cause the blade to lift and move forward 0.2mm at the corners. Voila! Crisp cuts that released cleanly.

Screenshot 2015-05-29 14.40.09IMG_1249

You Don’t Need a Monogram Font to Make a Monogram

I’m going to start out talking about traditional monograms, but I suspect I will digress! One thing I will say is that I DO NOT recommend the Monogram App unless you are only doing small monograms. The resolution of the monogram is small and the bigger you make it, the more jagged it cuts.

For a married couple, the monogram is traditionally: wife first LAST hubby first. Debbie and Allen Smith. First one, gont is freebie – Modern Typography. Second is a combo of Century Black and Campbell.

Screenshot 2015-05-16 12.05.47                Screenshot 2015-05-16 12.14.48


While a couple’s monogram should have a larger middle initial, an individual’s monogram does not. If it does, the order is: first LAST middle (or maiden initial). If the initials are all one size, they should be FIRST, MIDDLE, LAST.

Kathy Anne Connor’s monogram would look like this:

Screenshot 2015-05-16 12.58.13


If the middle letter is larger, it is the last name. This is a freebie called Riesling.

Screenshot 2015-07-05 18.07.52

Updating with a recent discovery – Michelle FLF. This is a font on Dafont also, so it’s free for personal use. There is no info about commercial use. I just checked the site and saw that it went from 4 downloads the day I found it to 430 downloads yesterday, so I hope it’s because people saw the pictures I posted on FB. This font developer deserves to be recognized!

Screenshot 2015-05-24 09.47.48

Let’s Learn about Samantha!

Samantha is one of the most beautiful fonts any font designer has ever made. It was developed by Laura Worthington at lauraworthingtontype.  Laura has devoted a lot of time to her artistry and deserves to be paid for her work.  This font is currently available on Mighty Deals and the $17 price really is a huge bargain for the Upright only. For $37 you get all 4 desktop fonts – Upright & Italic in regular and bold.

If you find my information useful and want to purchase from Mighty Deals, I would appreciate it if you would purchase from the link I posted. I get credit that I can use towards purchasing more fonts so I can post more information.

Mighty Deals – search Samantha or Zelda

You DO NOT want to order the web fonts. Those are for professional website developers.

That brings me to my discussion about, “What is a font? How come if I want both, I have to pay more than twice the cost of 1?” Samantha is a type face. This typeface consists of 4 fonts. They are Samantha Italic Regular, Samantha Italic Bold, Samantha Upright Regular, Samantha Upright Bold. If you pay the $17 you will only get a one Regular font and not a Bold Font. So, is this a bad thing?

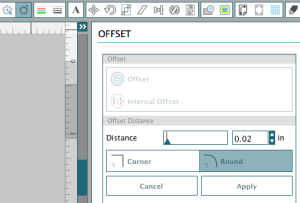
Well, I like having all 4 at my fingertips, so I invested the $37. If you’re not sure, you can buy just the upright. It can be manipulated in software to look sort of bold and italic. You can add an offset or shadow to it of 0.02″ and skew it 15% in your software.

Screenshot 2015-05-13 13.43.08

In Silhouette Studio, you create the italic look here and select 15%:

Screenshot 2015-05-25 17.28.28                        Screenshot 2015-05-25 17.12.33

To make it bold, use the offset function at 0.02″

So, I suppose the next think you’ll want to know is how do I use all those gorgeous swirls and glyphs.  The easiest way is if you buy super-expensive software like Adobe Illustrator or Corel Draw. But, since Laura Worthington loves crafters, she has mapped her font to unicode so you can use it in your cutting software or graphics software. Laura has information on her page Laura Worthington FAQ. There are also several great videos on YouTube: For PC and For MAC. Although these were made for the Silhouette Cutter, they work in any program.

Another great way to access the fonts if you have any cutter besides a Cricut is to use Sure Cuts a Lot 4 by Craftedge. You can access the characters right in the program. by using the fonts panel.

Screenshot 2015-05-13 14.06.24Screenshot 2015-05-13 14.18.43

Still not convinced you NEED this font? Want to see if you can really handle the extra steps? Why not try first with a less expensive font that still has beautiful glyphs? Zelda is another Mighty Deals bargain at only $7. Not as many choices but still gorgeous.

Screenshot 2015-05-13 14.32.50

Zelda is great when it is offset. Here’s an example

Screenshot 2015-05-14 11.52.35

There’s no telling how long these will remain on Mighty Deals. In the past, Samantha has come on again and off again.